From Comfort Food to Culinary Masterpiece: Crafting the Perfect Chicken Parmesan at Home
Ever wondered if you could recreate that restaurant-quality Chicken Parmesan experience in your own kitchen? The answer is a resounding yes! While often perceived as a dish best enjoyed in an Italian eatery, the truth is, mastering homemade Chicken Parmesan is not only achievable but incredibly rewarding. There’s an unparalleled satisfaction in serving a platter of perfectly crispy, tender chicken bathed in rich marinara and melted cheese, especially when paired with a side of perfectly al dente pasta. This comprehensive guide will empower you to transform simple ingredients into an unforgettable culinary experience, proving that gourmet flavors are well within your reach.
Ingredients & Kitchen Tools
Crafting the perfect Chicken Parmesan requires a thoughtful selection of fresh ingredients and a few essential kitchen tools.
- Boneless, Skinless Chicken Breasts (4 large, about 1.5 lbs): Choose plump breasts for a generous serving. Pounding them thin ensures even cooking and tenderness.
- All-Purpose Flour (1/2 cup): For dredging, creating a light coating for the egg wash to adhere to.
- Large Eggs (2): Beaten, forms the binding layer for the breadcrumbs.
- Panko Breadcrumbs (1.5 cups): Japanese-style breadcrumbs, known for their superior crispiness.
- Parmesan Cheese (1/2 cup, grated): Freshly grated is always best for flavor and meltability.
- Garlic Powder (1 tsp): Adds an aromatic depth to the breading.
- Onion Powder (1/2 tsp): Complements the garlic, enhancing the savory profile.
- Dried Italian Herbs (1 tsp): A blend of oregano, basil, thyme, and rosemary for classic Italian flavor.
- Salt & Black Pepper (to taste): Essential for seasoning at each stage.
- Marinara Sauce (2 cups, good quality store-bought or homemade): The foundation of the sauce.
- Fresh Mozzarella Cheese (8 oz, sliced or shredded): Melts beautifully and offers that signature stretch.
- Fresh Basil Leaves (for garnish): Adds a pop of color and fresh aroma.
- Olive Oil (for frying): A good quality oil for shallow frying the chicken cutlets.
- Heavy-Bottomed Skillet or Dutch Oven: For even heat distribution during frying.
- Large Baking Dish (9×13 inch): To assemble and bake the Chicken Parmesan.
- Meat Mallet or Rolling Pin: For pounding chicken breasts.
- Shallow Bowls (3): For the dredging station (flour, eggs, breadcrumbs).
- Tongs: For handling chicken safely in hot oil.
- Wire Rack: For draining excess oil from fried chicken.
- Grater: If using a block of Parmesan cheese.
- Serving Spoons: For sauce and pasta.
Prep Time & Cooking Schedule
- Prep Time: 25 minutes (includes pounding, breading, and mise en place)
- Cook Time: 30-35 minutes (includes frying and baking)
- Resting Time: 5 minutes (after baking, allows cheese to set and juices to redistribute)
Planning ahead is key to a smooth cooking experience. Start by preparing all your ingredients (mise en place). Pounding the chicken can be done in advance. While the chicken bakes, you can prepare your accompanying pasta and warm the extra marinara.
Step-by-Step Instructions
1. Prepare the Chicken: Place each chicken breast between two sheets of plastic wrap. Using a meat mallet or rolling pin, pound them to an even 1/2-inch thickness. This ensures uniform cooking.
2. Set Up Breading Station: In three shallow bowls, set up your dredging station. Bowl 1: Flour, heavily seasoned with salt and pepper. Bowl 2: Whisked eggs. Bowl 3: Panko breadcrumbs mixed with grated Parmesan, garlic powder, onion powder, dried Italian herbs, salt, and pepper.
3. Bread the Chicken: Dredge each pounded chicken breast first in the seasoned flour, shaking off excess. Then, dip into the egg wash, ensuring full coverage. Finally, press firmly into the seasoned Panko mixture, coating completely.
4. Fry the Chicken: Heat about 1/2 inch of olive oil in a heavy-bottomed skillet over medium-high heat. Once shimmering (around 350°F / 175°C), carefully place two breaded chicken cutlets in the pan, ensuring not to overcrowd. Fry for 3-4 minutes per side, until golden brown and crispy. Ensure the internal temperature reaches 165°F (74°C). Remove to a wire rack to drain excess oil. Repeat with remaining chicken.
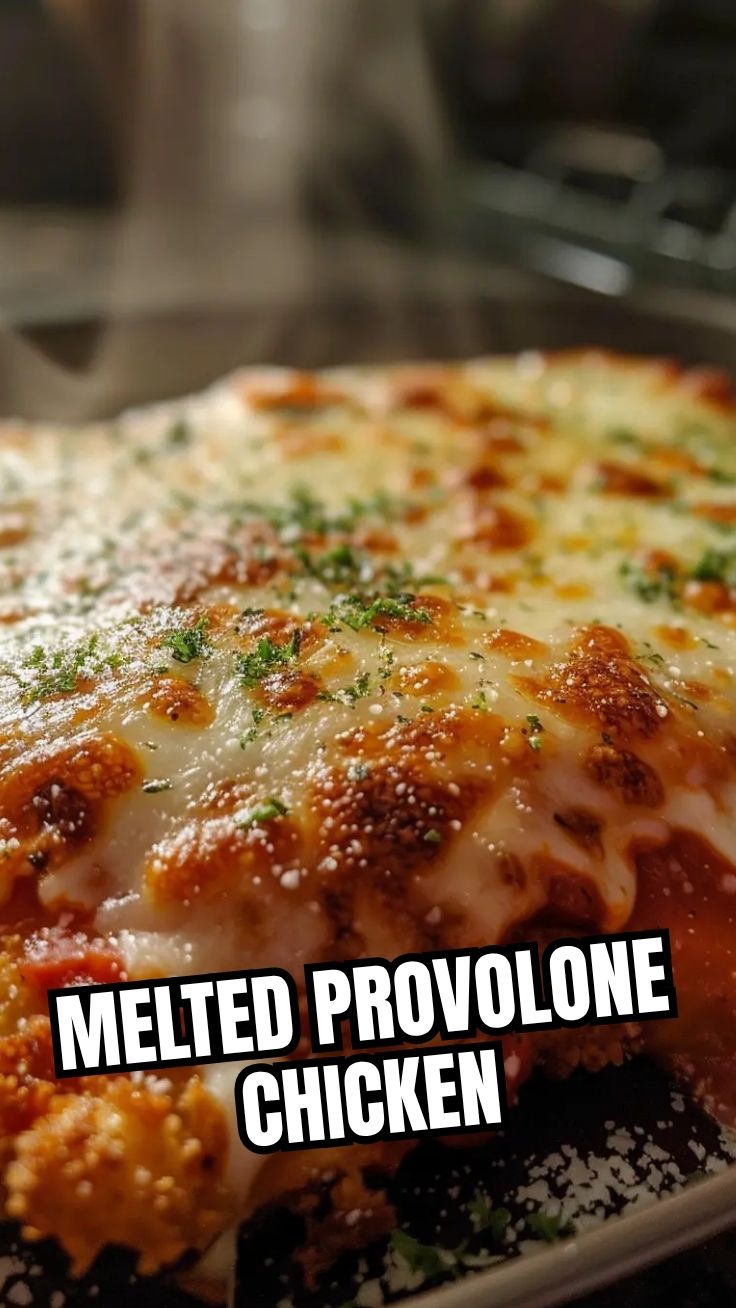
5. Assemble and Bake: Preheat oven to 400°F (200°C). Spread a thin layer of marinara sauce on the bottom of a 9×13 inch baking dish. Arrange the crispy Chicken Parmesan cutlets in a single layer over the sauce. Top each piece generously with more marinara sauce and then with slices or shredded fresh mozzarella.
6. Bake to Perfection: Bake for 15-20 minutes, or until the cheese is melted, bubbly, and lightly browned, and the chicken is heated through.
7. Serve and Enjoy: Let the baked Chicken Parmesan rest for 5 minutes before serving. Garnish with fresh basil. This dish pairs perfectly with a side of your favorite pasta, perhaps tossed in some extra marinara or a light olive oil and garlic sauce.
Nutritional Benefits & Advantages
This homemade Chicken Parmesan offers a balanced meal. Chicken breast is a lean protein source, supporting muscle repair and satiety. The marinara sauce provides lycopene, a powerful antioxidant, especially when made with ripe tomatoes. While frying is involved, using olive oil offers healthier fats compared to some other cooking oils. Furthermore, making it at home allows you to control salt and fat content, making it a more wholesome option than many restaurant versions.
Tips, Variations & Cooking Advice
- Pounding Perfection: Don’t skip pounding the chicken! It’s crucial for even cooking and tender results.
- Crispier Breading: For extra crunch, toast your Panko breadcrumbs lightly in a dry skillet before mixing with seasonings.
- Sauce Control: Use a good quality marinara sauce. Making your own from scratch will elevate the flavor even further.
- Cheese Selection: While fresh mozzarella is classic, you can also experiment with provolone or a blend of Italian cheeses.
- Gluten-Free Version: Use gluten-free flour and gluten-free breadcrumbs to make this dish celiac-friendly.
- Lower Fat Option: Instead of frying, you can bake or air-fry the breaded chicken cutlets for a lighter alternative. Preheat oven to 400°F (200°C) and bake for 20-25 minutes, flipping halfway.
- Spice It Up: Add a pinch of red pepper flakes to the breading or marinara for a subtle kick.
Common Mistakes to Avoid
- Overcrowding the Pan: Frying too many chicken cutlets at once lowers the oil temperature, resulting in greasy, soggy chicken. Fry in batches.
- Skipping the Pounding: Uneven chicken breasts will cook inconsistently – some parts dry, others undercooked.
- Not Seasoning at Each Stage: Bland chicken parmesan is a common disappointment. Season the flour, breadcrumbs, and even the sauce.
- Overcooking the Chicken: Chicken breast can dry out quickly. Keep an eye on it during frying and baking. Aim for an internal temperature of 165°F (74°C).
- Cold Marinara: Always warm your marinara sauce before layering it in the baking dish to ensure even heating and melty cheese.
Storage & Meal Prep Tips
Leftover Chicken Parmesan stores wonderfully!
- Refrigeration: Place cooled leftovers in an airtight container for up to 3-4 days.
- Freezing: For longer storage, cool individual portions completely. Wrap them tightly in plastic wrap, then aluminum foil, and place in a freezer-safe bag or container. It will keep in the freezer for up to 2-3 months. Thaw overnight in the refrigerator before reheating.
- Reheating: For best results, reheat in the oven at 350°F (175°C) for 15-20 minutes, or until heated through and the cheese is bubbly. Microwaving can make the breading soggy but is an option for quick reheating.
Conclusion
There you have it – a comprehensive guide to crafting an extraordinary Chicken Parmesan that rivals any restaurant offering. With crispy, tender chicken, savory marinara, and gooey melted cheese, all perfectly complemented by a side of delightful pasta, this dish truly is a labor of love that pays off in delicious dividends. Don’t be shy; embrace the process, savor the aromas, and enjoy the praise that will surely come your way. We encourage you to try this recipe, experiment with your own twists, and share your culinary successes with us in the comments below!
FAQs
Q1: Can I use pre-cooked chicken?
A1: While technically possible, pre-cooked chicken won’t achieve the crispy breading that makes a true Chicken Parmesan so special. It’s best to start with raw chicken breasts.
Q2: What’s the best type of pasta to serve with Chicken Parmesan?
A2: Spaghetti, linguine, or fettuccine are traditional choices, but penne or rigatoni also work well as they can hold the sauce nicely.
Q3: How can I prevent the breading from getting soggy?
A3: Ensure your oil is hot enough for frying, don’t overcrowd the pan, and drain the fried chicken on a wire rack. Also, baking shouldn’t be excessively long; just enough to melt the cheese and heat through.
Q4: Can I make this dish vegetarian?
A4: Absolutely! Substitute the chicken breast with large slices of eggplant (Eggplant Parmesan) or portobello mushrooms, following the same breading and baking steps.